Website User Guide
ONLINE ACCOUNT ORDERING ACCOUNT PORTAL
Sign In
Existing DEMDACO retailers who have previously set up online account access.
- Click on Sign In at the top right corner of the site.
- Enter your email address and password and click Sign In.

TIP: You can sign in to the website on any page at any time by clicking on the Sign In link at the bottom right corner of your screen.
Back to TopReset Temporary Password
You will need to reset your password if it’s the very first time you’re signing in since our new site launched March 31, 2020. Your temporary password is DD plus your account number. For example, if your account number is 123456 then your temporary password would be DD123456.
- Click on Sign In at the top right corner of the site.
- Enter your email address and temporary password and click Sign In.

- In the My Account section of the site, click on Password under Account Preferences.
- Enter a new password and enter again to confirm. Click Update.
The next time you sign in to DEMDACOretailers.com, use your new password.
Back to TopReset Password
Forgot your account password? It’s easy to reset.
- Click on Existing Retailers at the top of the site.
- Click on Forgot Password? in the sign in box.
- Enter your email address and click Reset Password.
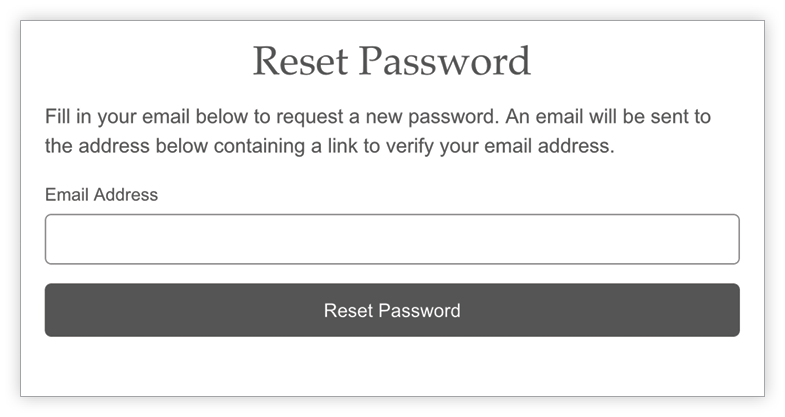
- Click on the link in the email you receive. Enter a new password and enter again to confirm.

Set Up Online Access
If you are an existing DEMDACO retailer but have not set up your online account access, it’s easy. Take these simple steps to gain immediate access to your account information, place orders and more.
- Click on Existing Retailers at the top of the site.
- Click on Set up online access in the sign in box.
- Enter your DEMDACO account number and email address.

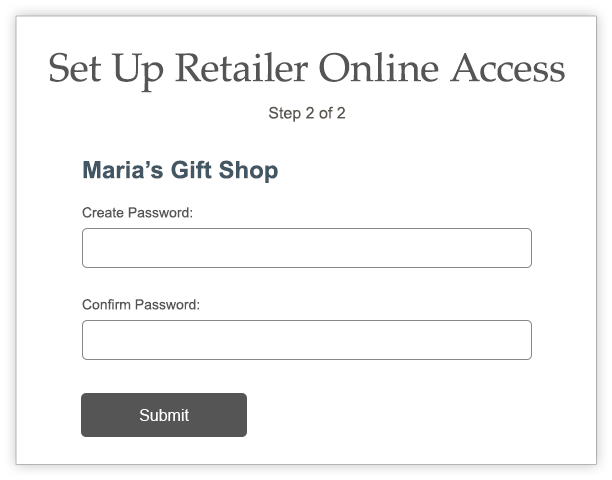
- Create and confirm password for your online account.
Become a Retailer
Want to become a DEMDACO retailer? Apply for a new account by submitting a wholesale application.
- Click on Become a Retailer at the top of the site.
- In the Become a DEMDACO Retailer section, fill out email and password and click Get Started.

- Fill out the Business Information section.

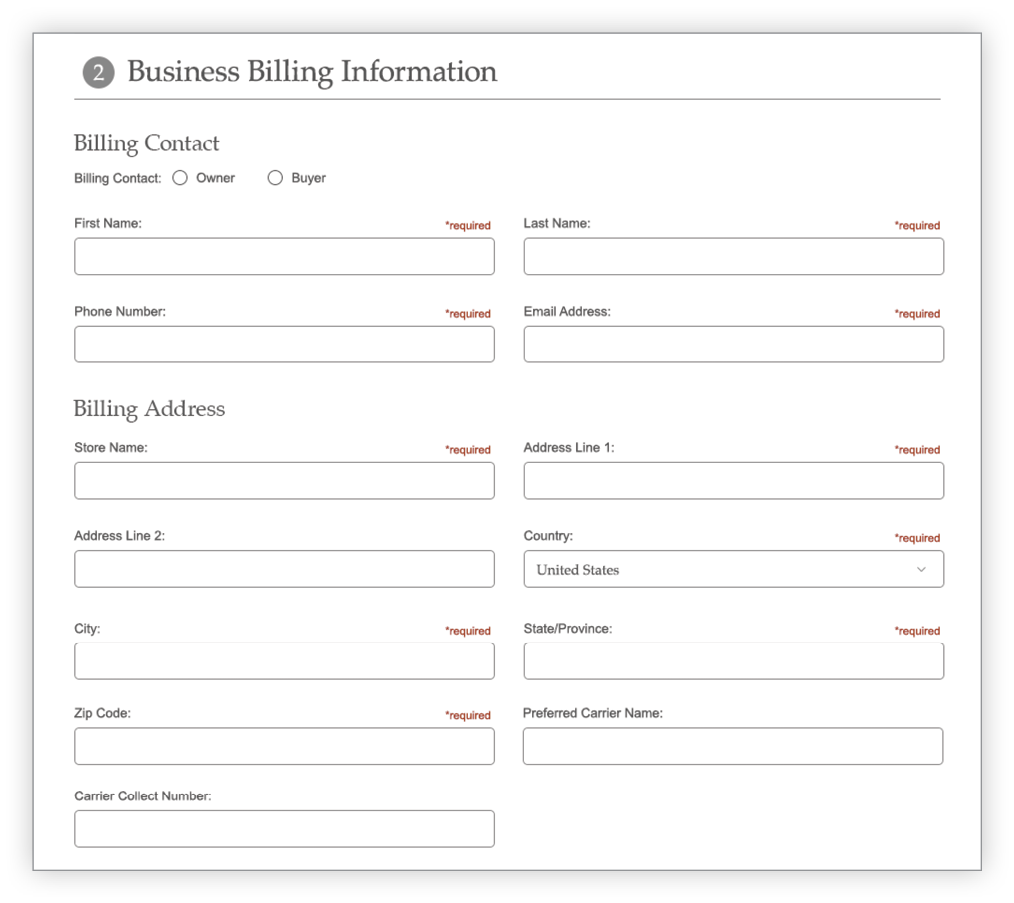
- Fill out the Business Billing Information section.
Optional: Upload your State Tax Reseller Certification Form. Access our Tax Form Library for help finding your state’s tax forms.

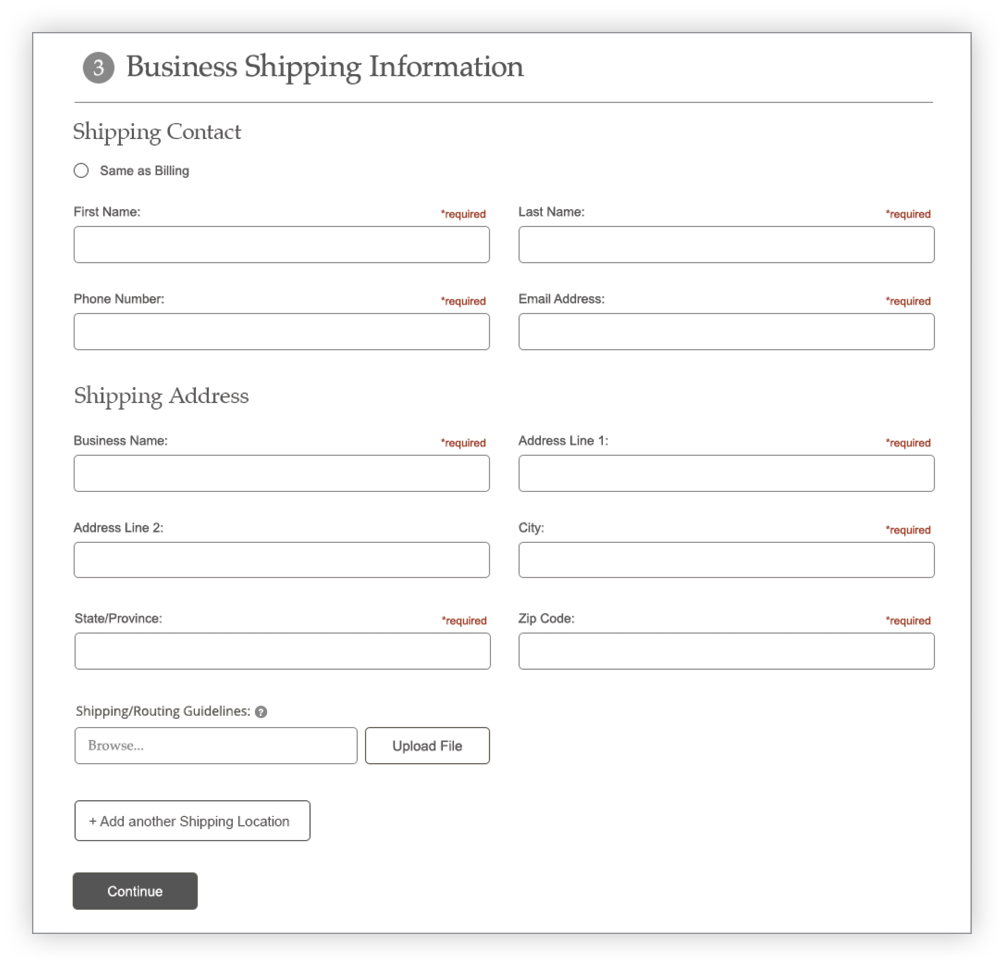
- Fill out the Business Shipping Information section, including multiple shipping locations and any Shipping/Routing Guidelines.
- Review the Product Distribution Agreement and agree to terms. Click Submit Wholesale Application.

You can browse and add items to your cart but cannot checkout until your account is active. Account activation usually takes 1 hour. You will receive an email confirmation when your account setup is complete. Customer Care will contact you if your retailer information cannot be verified.
Back to TopUsing the Search Box
Enter your search criteria in the search box. Click on a product or hit enter to see a full page of search results. Search by keyword, SKU number, UPC number, product name, collection, or artist.
 Back to Top
Using the Menu
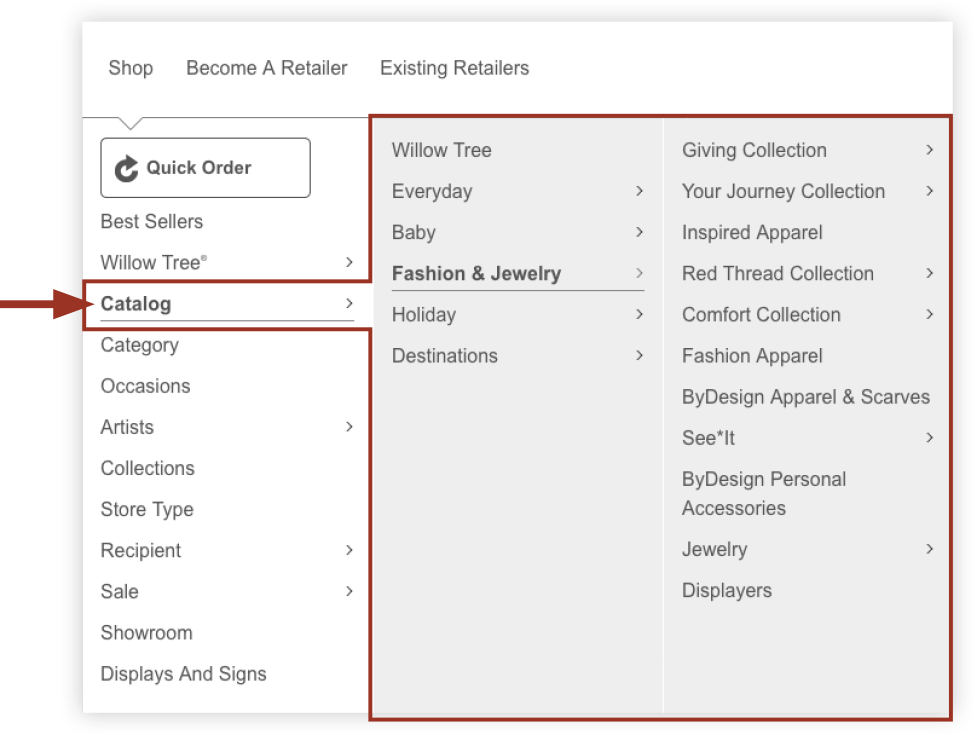
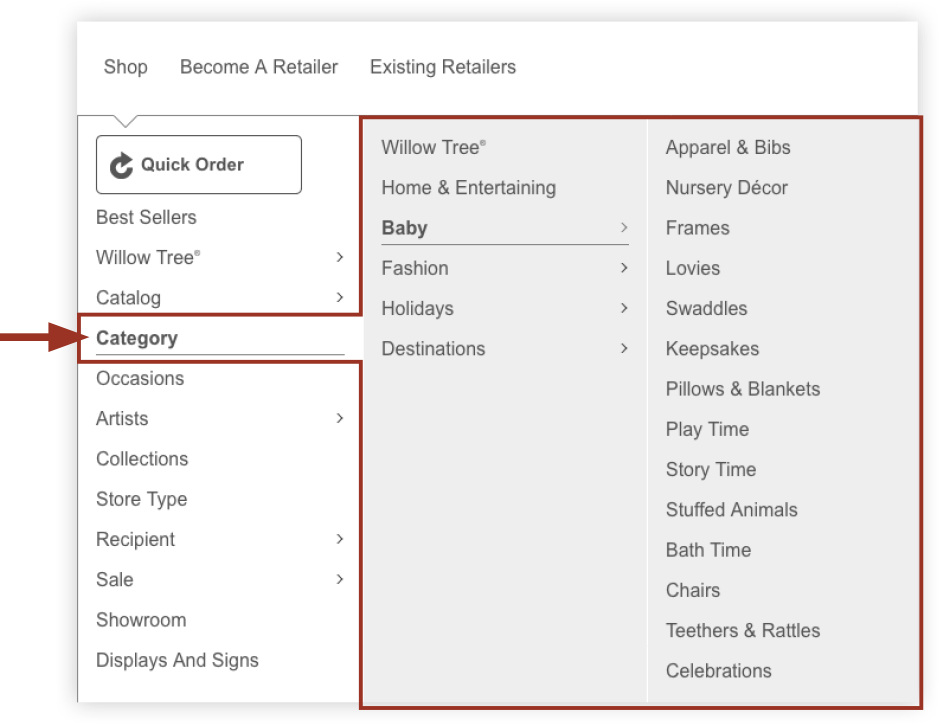
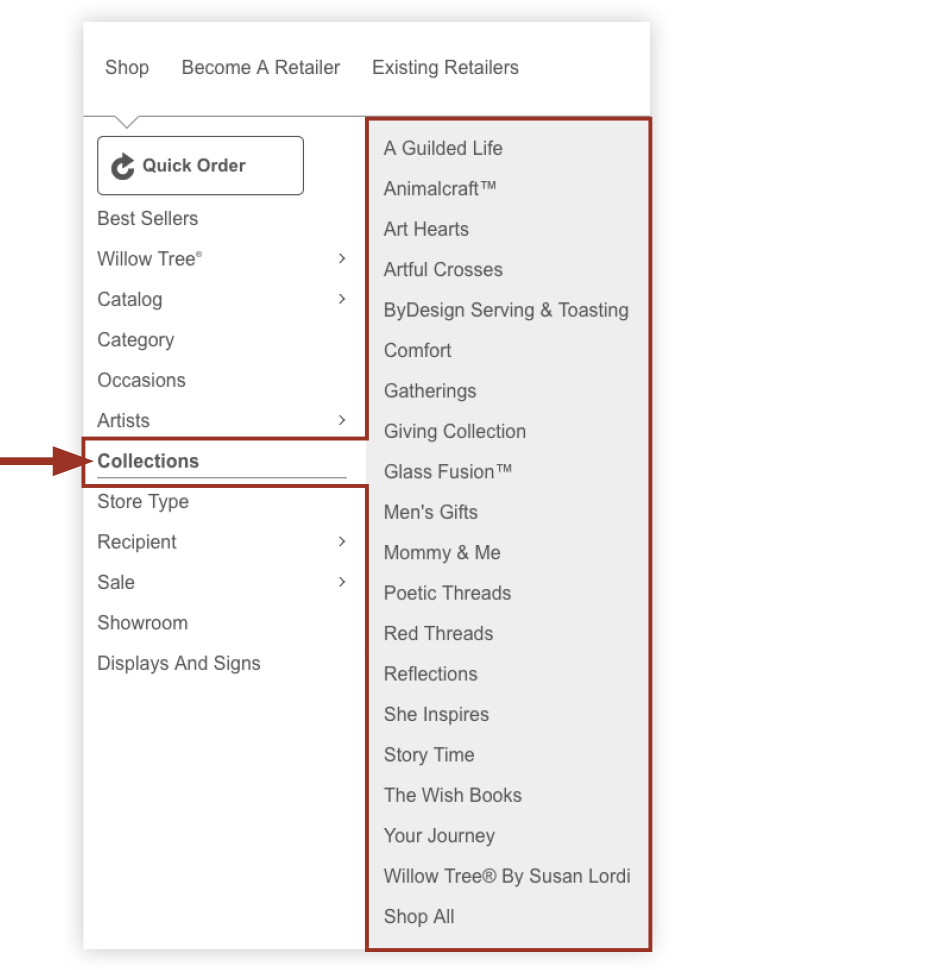
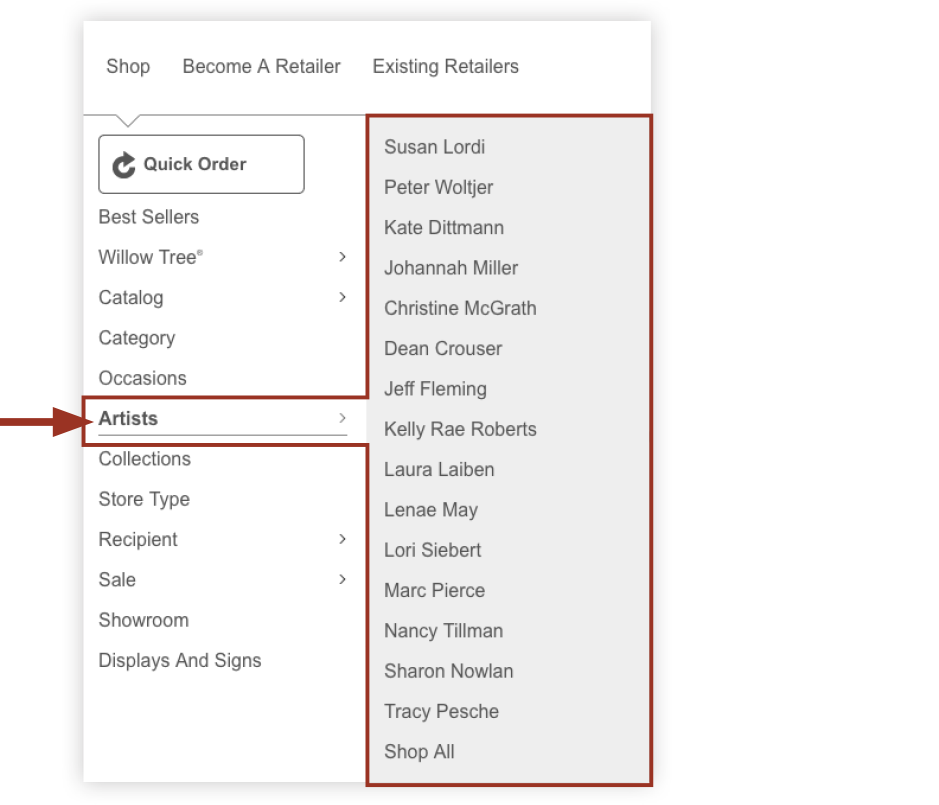
Use the Shop menu to find products. There are a number of ways to browse.
Shop by Catalog
Products are organized by collection in the same way they are in our printed catalogs.
Shop by Category
Products are organized by categories, such as mugs, scarves, plush and other formats.
Shop by Collection
Products are organized by our most popular collections.
Shop by Artist
Products are organized by individual DEMDACO artists. Also learn more about them and their collections.
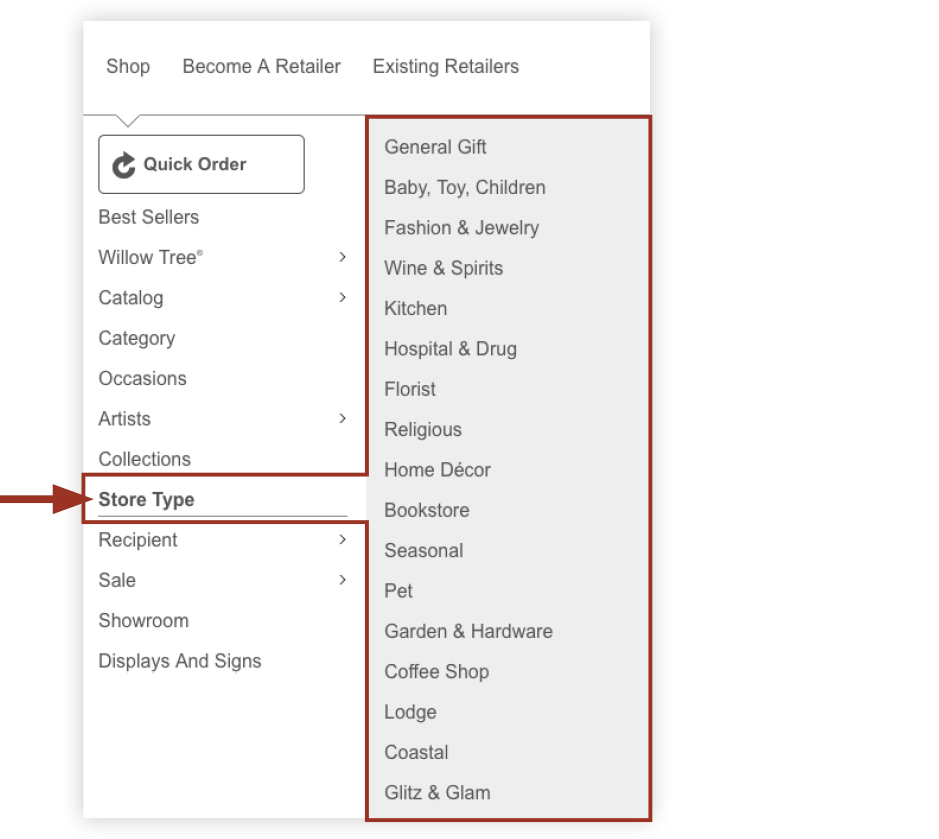
Shop by Store Type
Enjoy a more personalized experience when you shop by your specific retail category.
 Back to Top
Using Filters
On a product listing page a list of filters will display in the left sidebar beside the list of products. Use any combination of filters to narrow a category to see items by specific cycle introduction date, or based on availability, format, collection, and more!
- Click on a section heading to expand the section to see the filtering options. Click on the heading again to close the section.
- Check or uncheck filters by clicking on the square checkboxes.

Customize a Product
Customizing a product from our Make It Yours Collection is as easy as 1, 2, 3! Pick your region, choose your product and customize for free. Follow these simple steps to add customization.
- On a product page for a customizable product, click the "Customize for Free and add to Cart" button.
- Enter text in the provided text boxes. A preview of the customization will display on the picture of the product.
- If the product has font options, choose a font from the menu options.
- Click on "My Saved Designs" button to save a design until ready to add it to cart.
- Click on the "Reset" button to clear all the settings and begin again.
- Check the box to approve customization (or approve with no customization) and agree to the terms and conditions.
- Click the "Add to Cart" button.
Quick Order
Quick Order is a tool to quickly add products to your cart using three different methods. To use, sign in to the website. Click on Quick Order in the Shop menu. Choose one of the three options to quickly find and add products.

Enter Item Numbers
Use this option to type in each product item number.

- Enter item number in the form field.
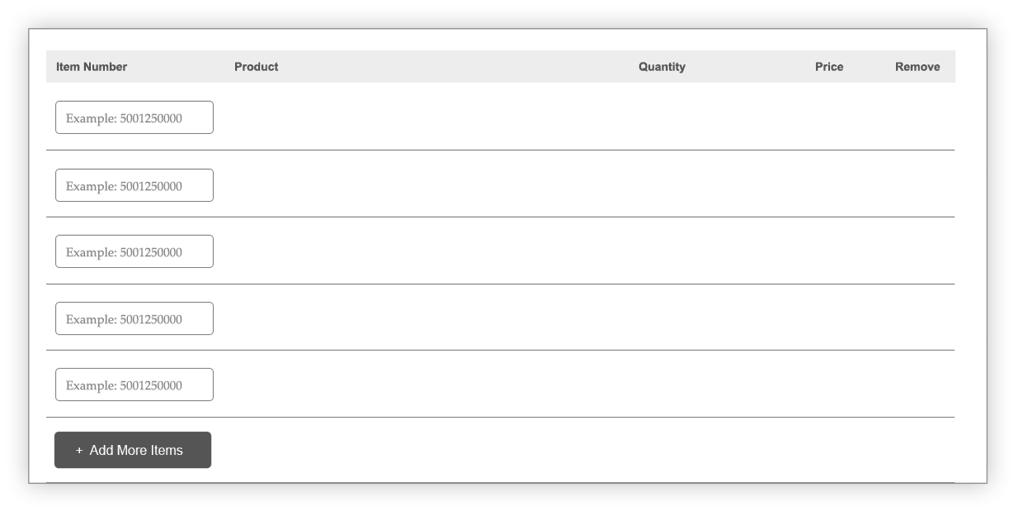
- Product image, name, and availability will appear. Select desired quantity for each product. Enter additional item numbers by clicking the Add More Items button.
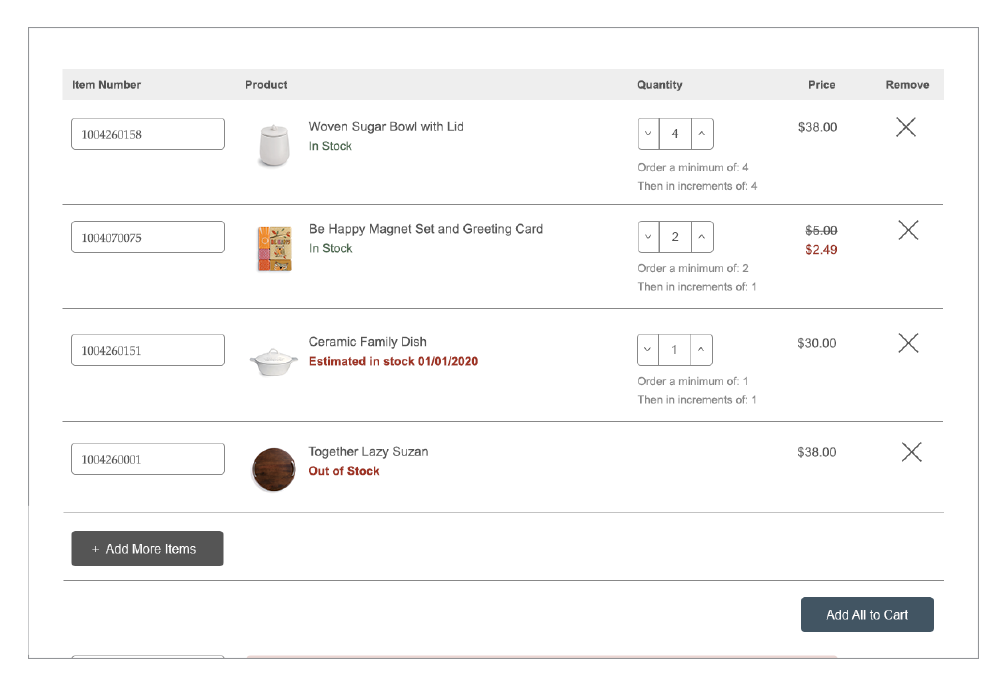
- When all item numbers and quantities are filled out, click Add All to Cart.
Import .CSV Spreadsheet
Use this option to import a list of item numbers and quantities in the form of a .CSV file.

- Click Download .CSV template to use our form template. In the file, list all item numbers in the first column and all quantities in the second column. Save file to your computer.

- Click Import Item List and select the file to upload from your computer.
- All products and quantities from the form will appear. Make any adjustments needed on the screen. Click Add All to Cart.
NOTE: You will see if any item numbers are out of stock or not found.

Order History
Use this option to bring up item numbers from your previous orders.

- Choose a date range from the dropdown menu or set a custom date range. Click Submit.

- Product image, name, and availability will appear on the screen.
TIP: Adjust the date range if you’re seeing too many or not enough past item numbers.
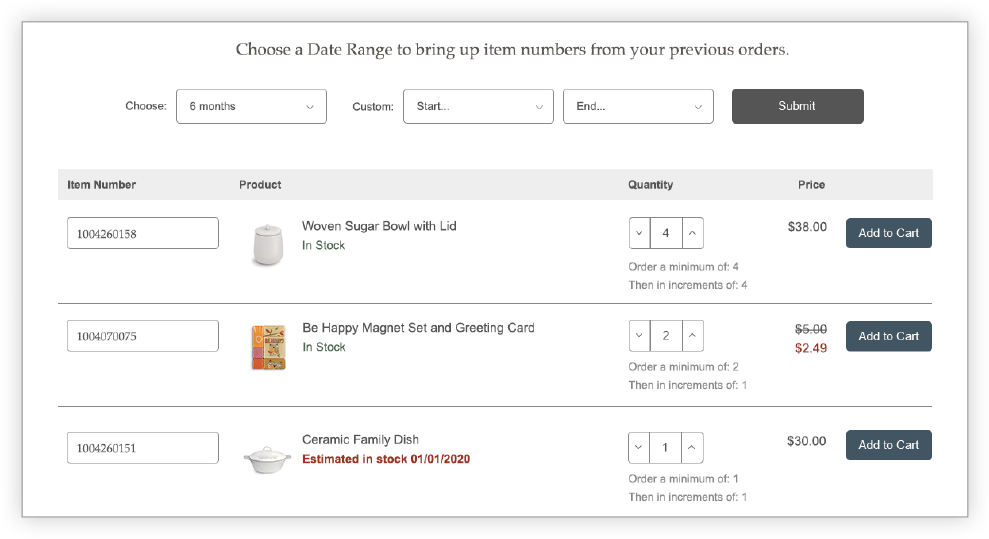
- For each item, select desired quantities and click Add to Cart. When finished, you can click View Cart to to continue to checkout.

Checkout
- 1. Navigate to your cart by clicking on the bag icon in the top right corner. Click on View Cart to view all the contents of your cart.
NOTE:To skip the cart page and go directly to checkout, click Check Out Now.
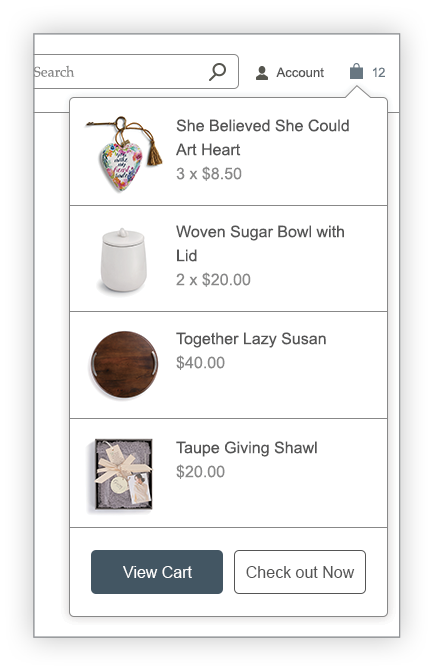
- On the cart page, verify the items and quantities and make any adjustments. To add a coupon code, click Add Coupon and enter the code. Click Check Out to continue.

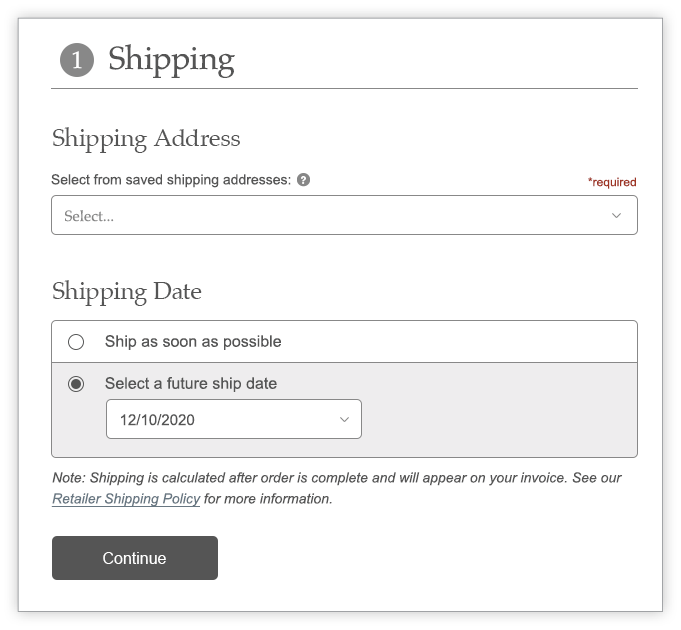
- Select a shipping address from your account’s saved addresses. Select a shipping date that is either as soon as possible or in the future.
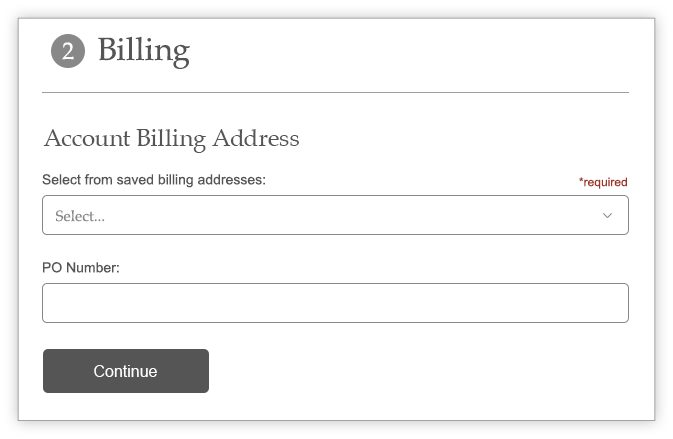
- Select a billing address from your account’s saved addresses. Optionally, enter a PO number.
- Enter credit card information. If you have terms on your account, you will have the option to select Terms on Account. Click Place Order.

You will receive an order confirmation email. Order can also be viewed in the Order Center in your Account Portal.
Back to TopOrder Center
Orders
- Search by order number or PO number to quickly find an order.
- Open Orders are listed in descending date order with quick reference of status. You can click on View Details to view that order.
- You can also click on Orders in the sidebar menu to view a list of all orders and click to view details.
Shipments
- Recent & Upcoming Shipments will be listed in descending date order so you don’t have to search and can quickly click on View Details to go to that order.
- You can also click on Shipments in the sidebar menu to view a list of all shipments and click to view details.
Returns
- Click on Returns in the sidebar menu to start a return on an order.
 Back to Top
Check Order Status
Signed In
- Sign in to the website. Click on Check Order Status in the footer.

- In the Order Center, enter your order number in the search field and click Check Status.

- On the order details page, you can see all the details of your order, including shipments, tracking numbers, and pack lists.
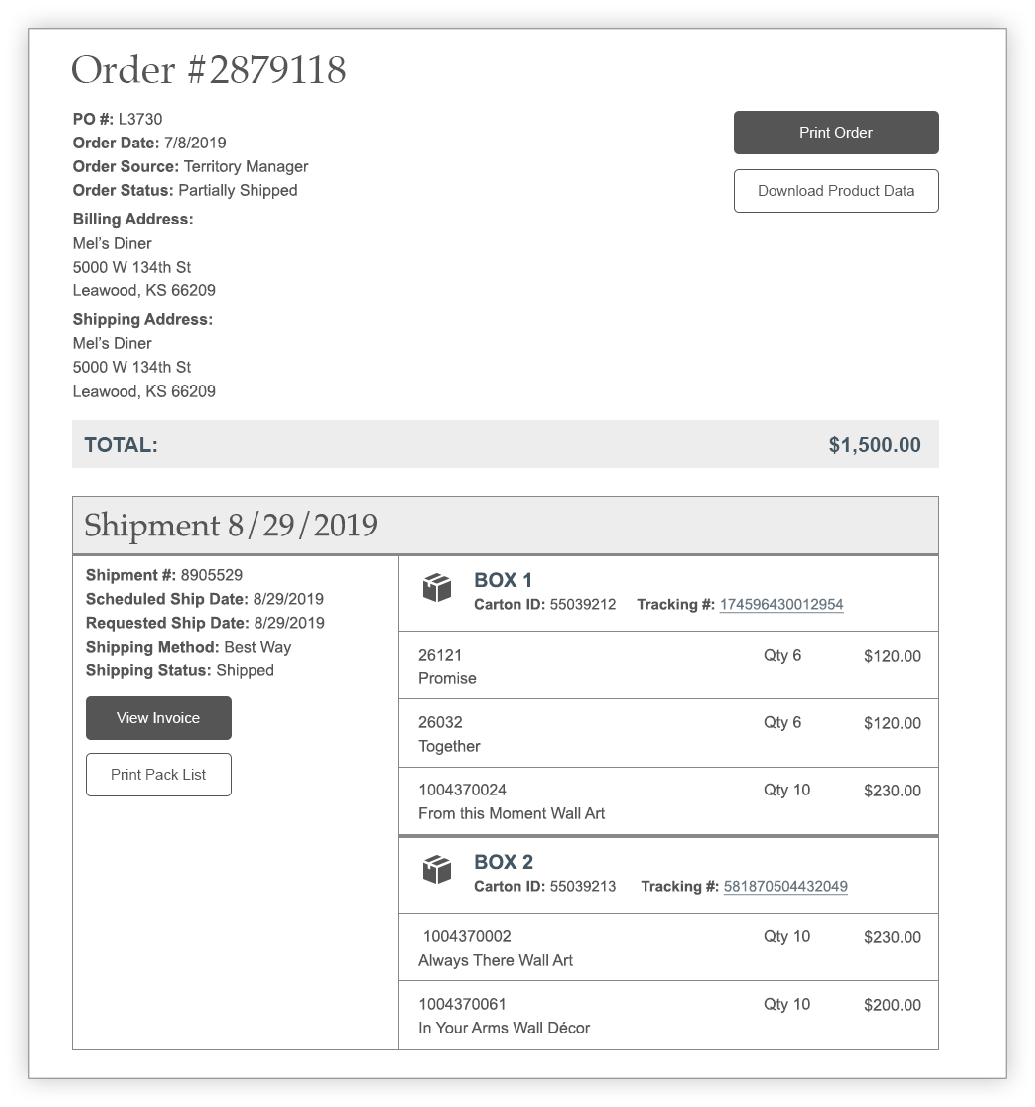
TIP: In the Account Portal, you can also click on Orders in the sidebar menu to view a list of all orders and click to view details.
Not Signed In
- Click on Check Order Status in the footer.

- Enter your order number, account number, and billing zip code and click Check Status.
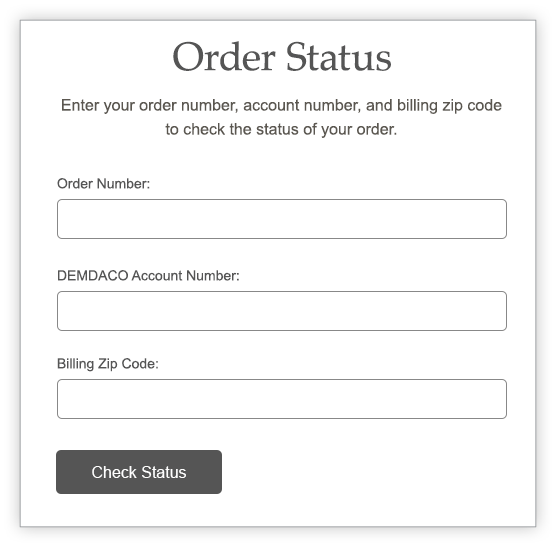
- On the order details page displayed, you can see all the details of your order, including shipments, tracking numbers, and pack lists.

Print Pack List
Signed In
- Sign in to the website. Click on Check Order Status in the footer.

- In the Order Center, enter your order number in the search field and click Check Status.

- On the order details page, you can see all the details of your order. Find your shipment listed in descending date order and click on the Print Pack List button.

- The Pack List will open in your web browser. Click print.
TIP: In the Account Portal, you can also click on Orders in the sidebar menu to view a list of all orders and click to view details.
Not Signed In
- Click on Check Order Status in the footer.

- Enter your order number, account number, and billing zip code and click Check Status.

- On the order details page displayed, you can see all the details of your order. Find your shipment listed in descending date order and click on the Print Pack List button.

- The Pack List will open in your web browser. Click print.
Submit a Return
Begin a Return Merchandise Authorization (RMA)
- Sign in to the website. Click on My Account in the footer.

- In the Order Center, click on Returns in the sidebar menu.
- Fill out the form and upload images of products. Click on Add Another Item to add another product to the return request. Click Submit RMA Request.
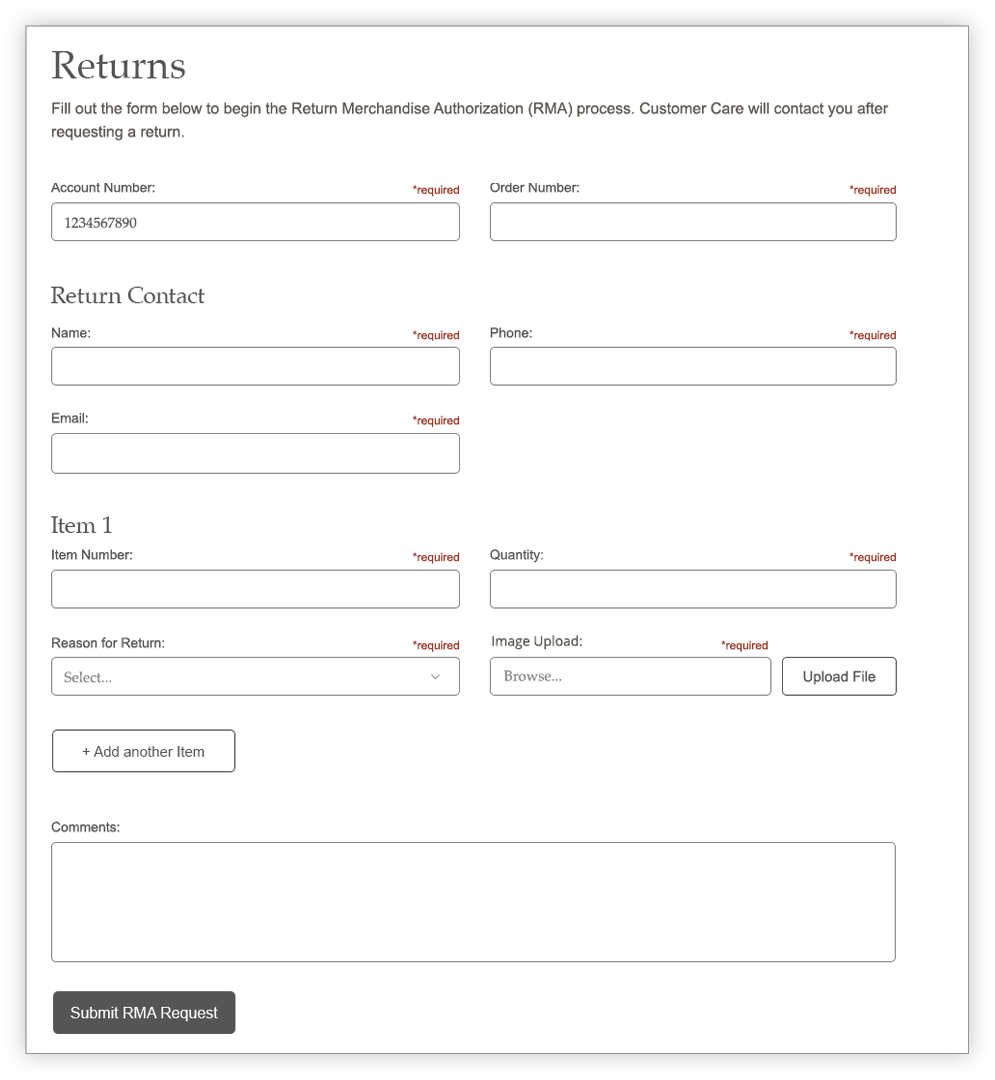
NOTE: Customer Care will contact you to process your return request.
Back to TopPayment Center
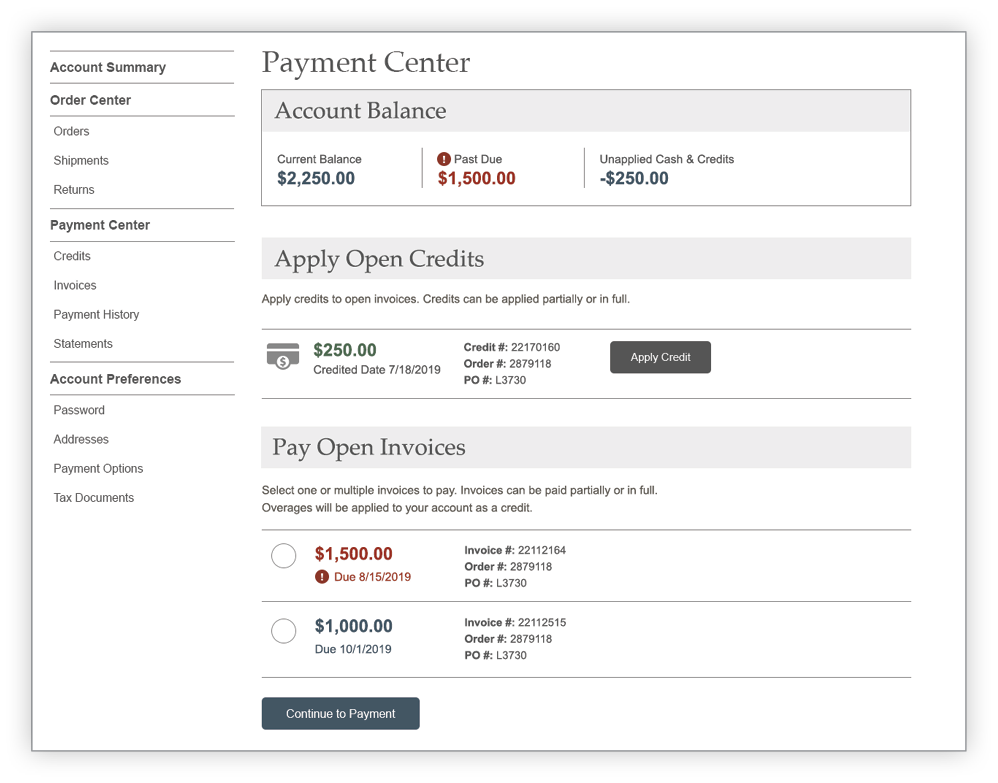
Credits
- The Apply Open Credits section shows open credits that can be applied to open invoices.
- You can also click on Credits in the sidebar menu to view a list of all credits and details.
Invoices
- The Pay Open Invoices section lists all open invoices that can be selected for payment.
- You can also click on Invoices in the sidebar menu to view a list of all invoices and details. You can pay a single invoice on the Invoice detail page.
Payment History
- Click on Payment History in the sidebar menu to view a list of all payments made on your account.
Statements
- Click on Statements in the sidebar menu to view your account statements.
 Back to Top
Apply a Credit
If you have an open credit on your account from a return or overpayment, you can apply it to an open invoice(s).
- Sign in to the website. Click on My Account in the footer.

- In the Payment Center, you can view all open credits on your account. Click on the Apply Credit button to the credit you’d like to apply.
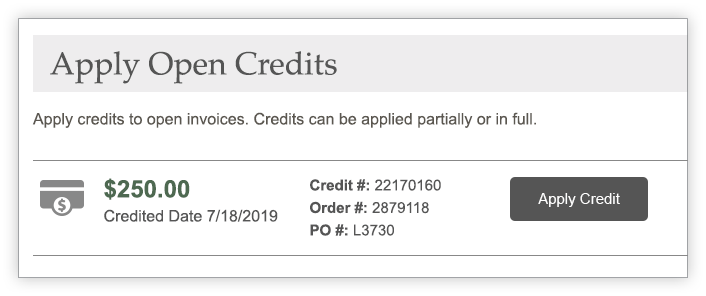
- Select which open invoice(s) you’d like to apply the credit to. Invoices can be paid partially or in full. Enter the dollar amount to be applied to each invoice selected. Click Apply Credit.

You will receive an email confirming your credit was applied.
NOTE: It takes 24-48 hours for returns, credits, and other changes to apply to your account.
Back to TopView Invoice
- Sign in to the website. Click on My Account in the footer.

- In the Payment Center, click on Invoices in the sidebar menu.
- Invoices are listed in descending date order. Click on View Details button.
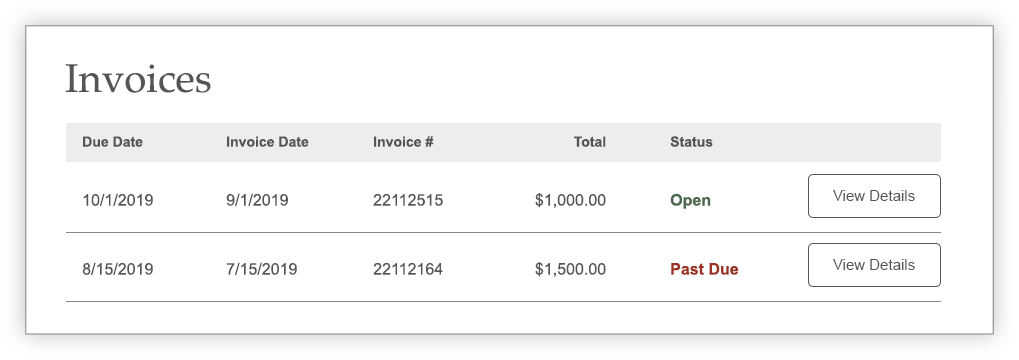
- On the invoice details page you can see all the details of your invoice, including list of products, payments posted, and how much is still owed.

TIP: Click on Pay Invoice to pay the one invoice. To pay more than one invoice, go to the Payment Center to select multiple invoices to pay at once.
Back to TopPay Invoice
Signed In
- Sign in to the website. Click on Pay Invoice in the footer.

- In the Payment Center, you can view all open invoices. Select which invoices you’d like to pay. Enter the dollar amount you’d like to pay for each invoice. Ensure your total amount is correct and click Continue to Payment.
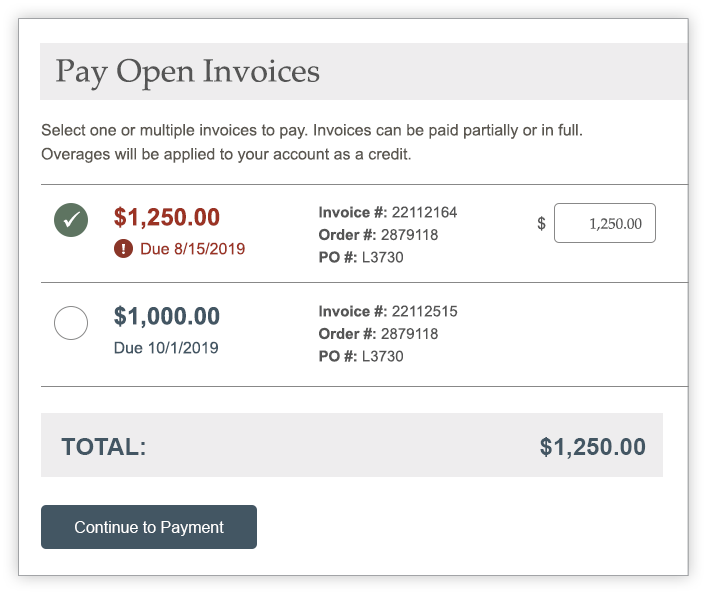
- Enter credit card information and click Submit Payment.

You will receive an email confirming your payment.
Not Signed In
- Click on Pay Invoice in the footer.

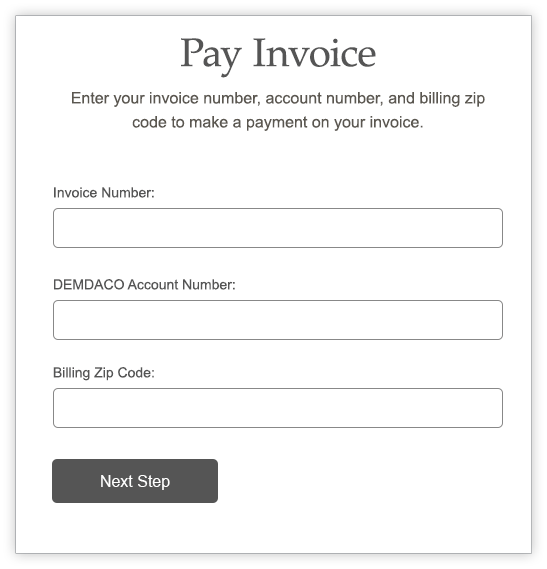
- Enter your invoice number, account number, and billing zip code and click Next Step.
- Enter payment amount and credit card information and click Submit Payment.
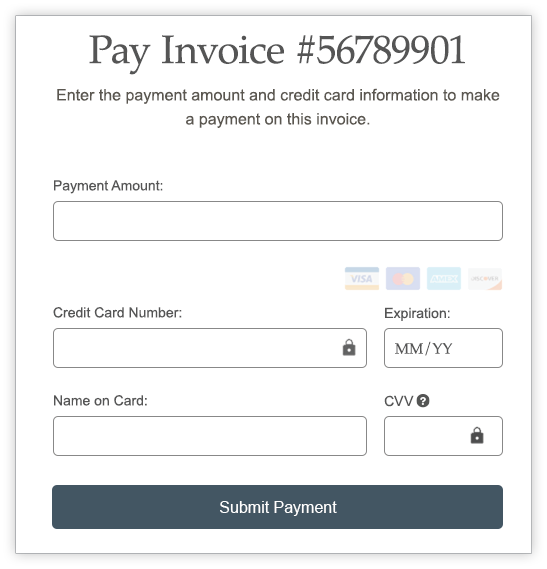
The email address on the account will receive an email confirming payment.
Back to TopAccount Preferences
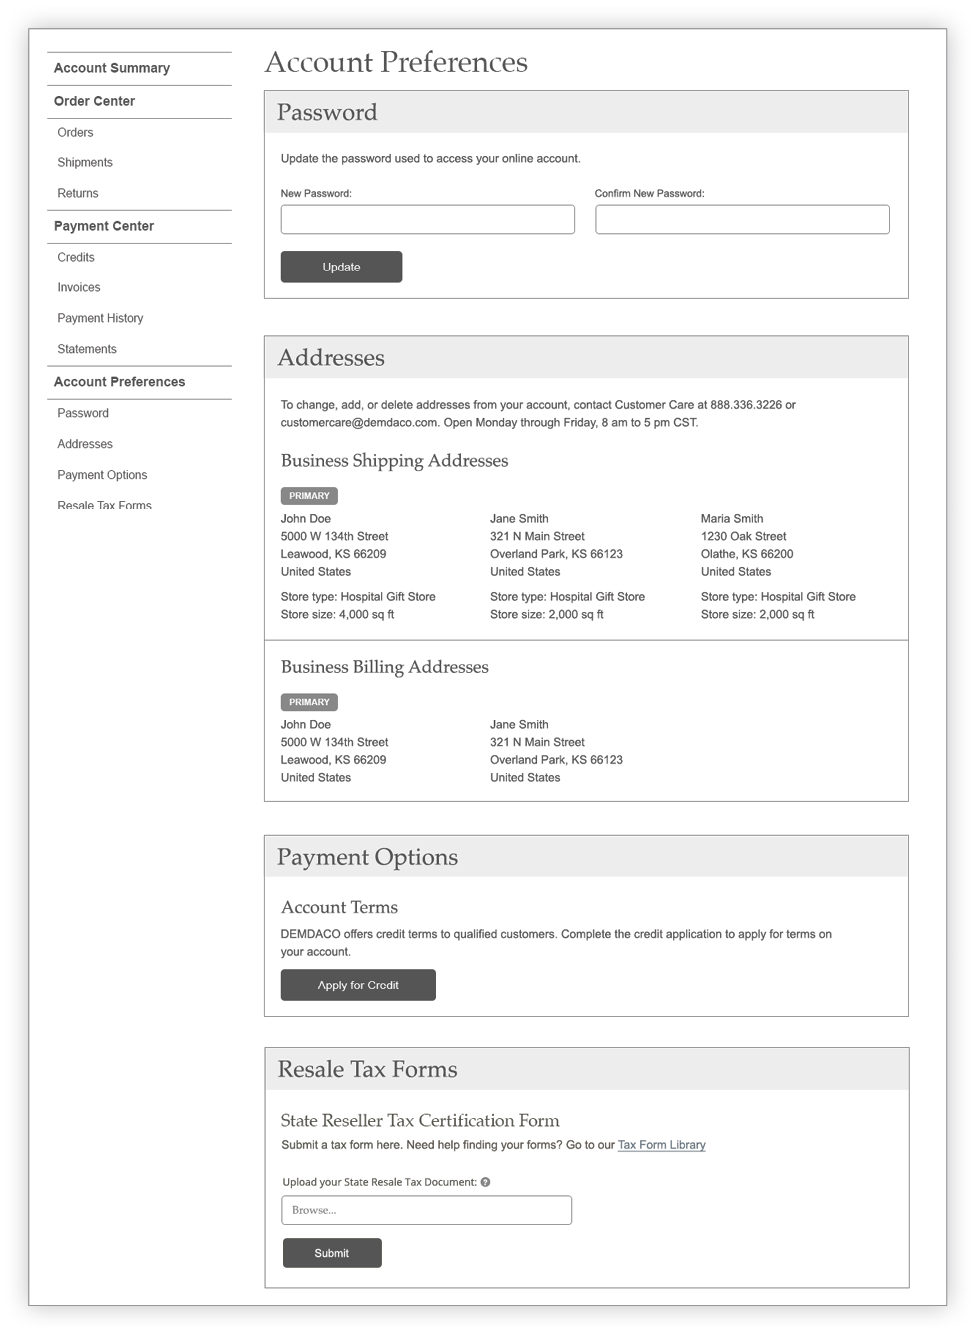
Password
Change the password to your online account.
Addresses
View the shipping and billing addresses on file for your account.
Payment Options
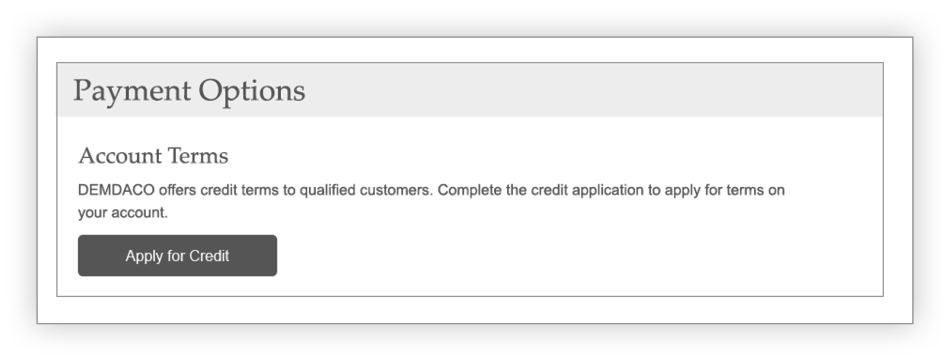
The terms on your account will be displayed in this section. If you do not have terms, you can click the button to apply for credit.
Resale Tax Forms
You can upload a state reseller tax certifcation form here and access our Tax Form Library.
 Back to Top
Email Preferences
Log in to your account
In your Account section under Account Preferences, click on Email Communications.
Edit an existing contact
Click the “Edit” button next to a contact. Add a new contact by clicking the “+ Add Contact” button at the bottom of the list.

Updating contact information
Fill out the person’s contact information and select which email communications you’d like them to receive. Save changes.
 Back to Top
Apply for Credit Terms
- Sign in to the website. Click on My Account in the footer.

- Click on Payment Options under Accout Preferences in the sidebar menu. Click on Apply for Credit.
- Fill out your business information.

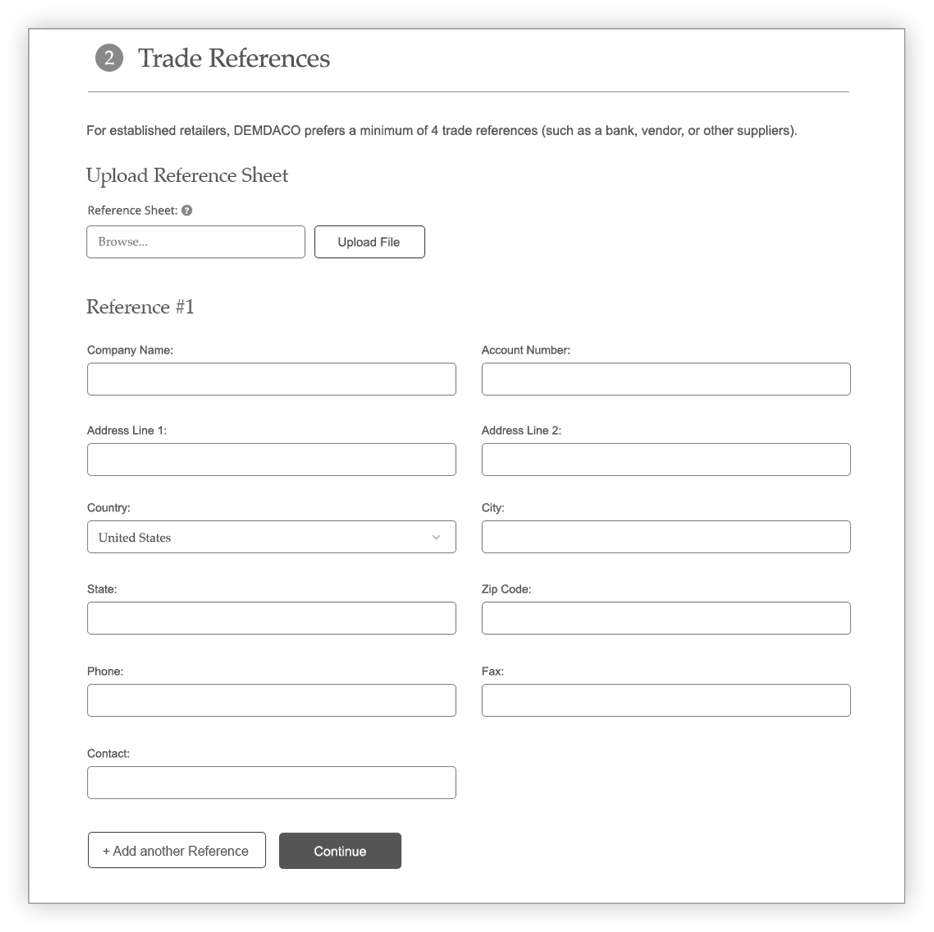
- For established retailers, DEMDACO prefers a minimum of 4 trade references. Upload a reference sheet or fill out the form with your trade references. Click Add Another Reference to add additional references.
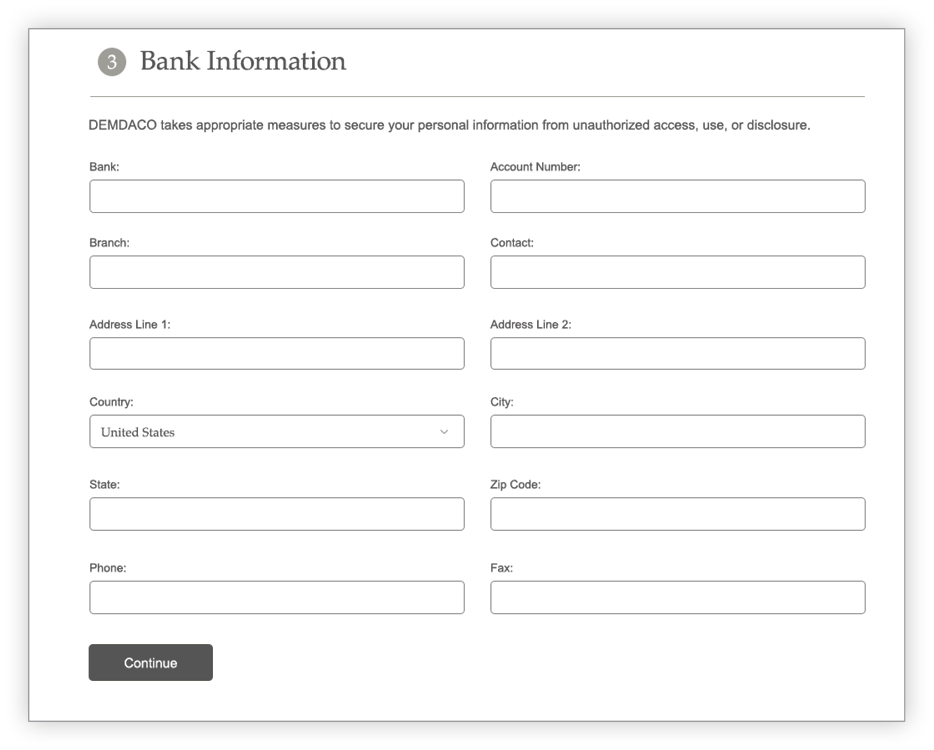
- Fill out your bank information.
- Fill out your company officers/owners.

- Electronically sign your credit application. Click Submit Application.

You will receive an email notification when terms of your credit are approved.
Back to TopBrand Connect
Learn about Brand Connect, DEMDACO's library of online images. Visit www.DEMDACOretailers.com/brandconnect to access the library, brand guide, and the quick start guide for additional help with how to share and download for your store’s marketing and POS needs.


